
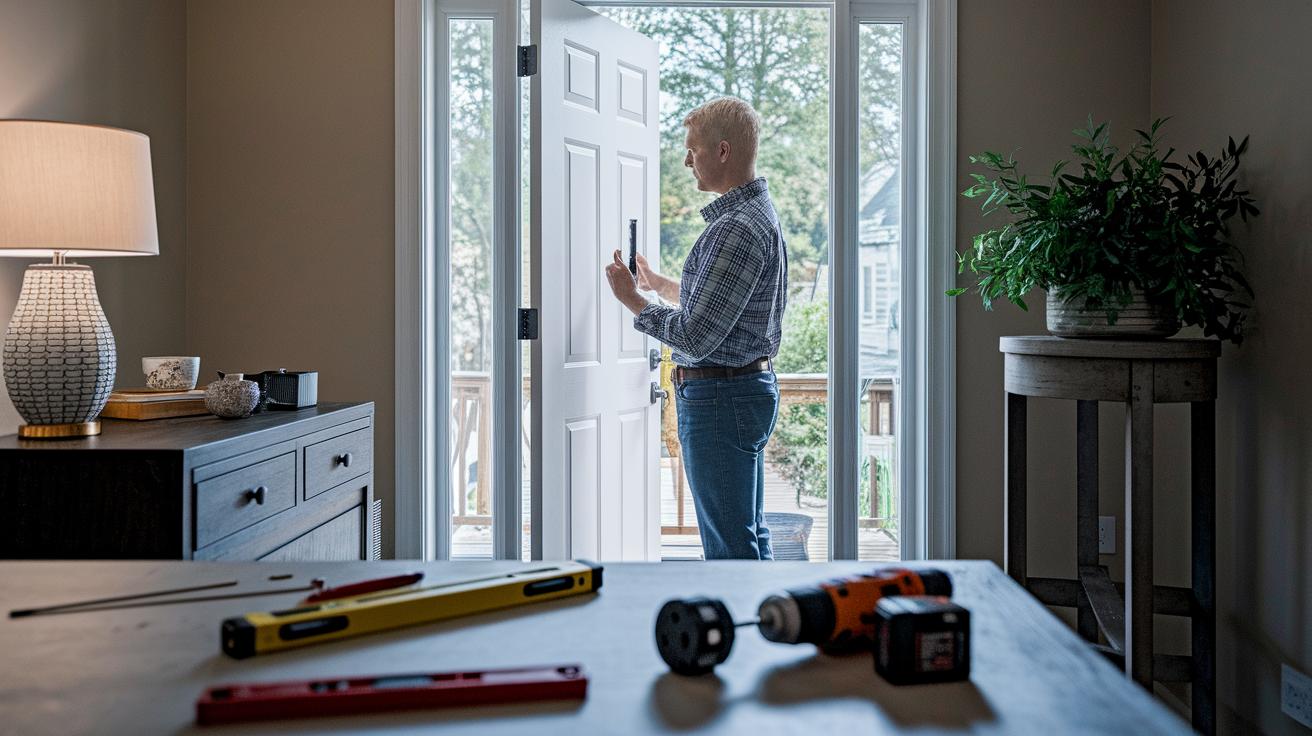
Have you ever thought about upgrading your doorbell to boost your home's security without any hassle? Installing a Ring doorbell can be simple if you follow a clear, step-by-step plan. Our guide walks you through everything, from gathering the right tools to testing the app, to help you set it up safely and efficiently. Every step is detailed so you can be sure your new device fits perfectly on your wall. With these easy instructions, you'll start enjoying smart doorbell features in no time.
Step-by-Step Ring Doorbell Installation Guide
-
Gather all the necessary tools. Check that you have a Philips screwdriver, a drill fitted with masonry bits, a level, and a measuring tape. It helps to verify that your drill batteries are charged ahead of time.
-
If you're using a battery-powered model, fully charge the battery before you begin. For Pro models, you can move ahead without this step.
-
Download the Ring app and test your Wi-Fi signal near the installation spot. This quick process, which should take about 10 minutes, ensures you have a reliable connection for a smooth setup.
-
Turn off the power at your breaker box to keep things safe. This simple precaution helps you avoid any electrical hazards during installation.
-
Remove your old doorbell carefully. Use a screwdriver or box cutter to expose the screws and wiring so you can disconnect it safely.
-
Install the new bracket. First, measure the ideal height, about 4 feet for facial recognition or up to 10 feet for a wider view, and use a level to line it up properly. For brick or stucco surfaces, remember to use the correct anchors.
-
Connect the wires according to your model’s instructions. If your doorbell requires a diode for digital chimes, follow the provided diagram to install it correctly.
-
Firmly snap the Ring doorbell unit onto the bracket until you hear it click into place.
-
Restore power and check the LED light on the doorbell. This confirms that the device is properly connected.
-
Finally, configure your app settings by setting your motion zones, adjusting night vision, and choosing your notification preferences. This last step, taking roughly 15 minutes, completes your personalized setup.
Pre-Installation Checklist for Ring Doorbell Setup
Before you begin, check whether your doorbell is battery powered or hardwired. For hardwired models, verify that your wiring delivers between 8 and 24 VAC.
Clear out any old fixtures or obstacles from the mounting area so you can measure accurately and keep everything level.
Review the main installation guide for safety tips and preparation steps. For example:
- Switch off the circuit breaker to avoid electrical shocks.
- Use your smartphone to test the Wi‑Fi signal at the mounting location.
- Gather all the necessary tools, such as a Philips screwdriver, a drill with masonry bits, a level, anchors, screws, and the installation instructions.
Mounting and Wiring Your Ring Doorbell
Follow steps 6, 7, and 8 of the Ring Doorbell Installation Guide for all the details on height, leveling, and safely mounting your doorbell on brick, stucco, or other surfaces. These steps cover everything from setting the right height, around 4 ft for capturing faces and 8–10 ft for package monitoring, to using a level when positioning your bracket.
Here's what you need to know:
| Step | Action |
|---|---|
| Height Measurement | Mount at about 4 ft for facial captures or 8–10 ft for package monitoring |
| Bracket Placement | Use a level for accurate alignment |
| Masonry Surfaces | Secure the bracket with a drill, masonry bit, and plastic anchors |
| Wiring (Hardwired Models) | Connect existing doorbell wires and add a diode for digital chimes |
| Battery-Powered Models | Insert the battery as instructed |
Before wrapping up, double-check that your bracket is solidly fixed and all wiring matches the diagram. This extra check ensures your installation is safe and reliable.
Configuring Ring Doorbell Settings in the App

Start by downloading the Ring app from your app store and setting up your account. When you open the app, add your doorbell by scanning its QR code or by entering the setup key that came with it. A quick tip: select "Scan the QR code" and follow the on-screen instructions.
Once your doorbell is added, connect it to your home Wi-Fi by entering your network name (SSID) and password. Give the device a few minutes to update its firmware so it benefits from the latest features and fixes.
After the update, personalize the motion settings for your home. Choose specific motion zones, adjust the sensitivity, and set privacy zones to reduce unwanted alerts. You can also enable night vision and set up notifications so you know when any activity is detected. If you want to save video clips for later viewing, consider signing up for the optional Ring Protect plan.
These straightforward steps help you get your Ring doorbell ready for everyday use with minimal hassle.
Troubleshooting Ring Doorbell Installation Issues
If your Ring doorbell isn’t working properly, first check your Wi-Fi. The doorbell’s LED light can tell you a lot. For instance, rapid blinking often means the Wi-Fi signal is too weak. In that case, try moving your router closer or adding a Wi-Fi extender. A constant LED error might mean the network doesn’t reach that spot well.
Another frequent issue is with power. If the doorbell won’t start or your chime doesn’t sound, double-check that the circuit breaker was turned off and then restored after installation. Also, make sure all the wires are connected securely. Incorrect wiring can stop power from reaching the doorbell, so comparing your setup to the wiring diagram can spot any mistakes.
Sometimes the app won’t pair with the doorbell. This can happen if you enter the wrong password or the firmware is outdated. A quick restart of your router and updating the app might help. If the problem continues, try rebooting the doorbell or resetting it to factory settings before setting it up again.
Optimal Placement and Compatibility Considerations
Before you finalize your doorbell setup, remember that a model with a 130° field of view and at least 1080p resolution gives you clear and detailed images. For example, you might set it up so that its wide-angle lens captures every corner of your entryway.
Avoid mounting the doorbell where it gets caught in direct sunlight or deep shadows because that can cause glare. If necessary, adjust its position or add some shading to improve the picture quality.
Also, make sure to check the chime compatibility as explained in the wiring section so that it works smoothly with your home system.
Maintenance and Safety Tips for Ring Doorbell Installations
Keep your Ring doorbell running smoothly with these easy tips. First, grab a soft, lint‑free cloth each month and gently wipe the lens. This simple step gets rid of dust and smudges so your images always look clear.
If your doorbell runs on batteries, check the level regularly. Recharge every few months or switch to a hardwired kit to avoid sudden shutdowns. Also, keep an eye out for firmware and app updates through the Ring app; they usually improve both security and performance.
For a secure, lasting installation, take a look at the hardware every season. Tighten any loose screws and check that the mounting bracket is still stable. And don’t forget: always switch off the power at the breaker before you start any work to prevent electrical shocks.
Here’s a quick checklist to help you out:
| Task | Action |
|---|---|
| Lens Cleaning | Wipe monthly with a soft, lint‑free cloth |
| Battery Check | Monitor often; recharge every few months or consider a hardwired kit |
| Firmware Updates | Install updates via the Ring app |
| Hardware Check | Tighten screws and ensure the mounting bracket is secure each season |
| Safety | Turn off power at the breaker before inspections |
Following these steps will help your Ring doorbell stay reliable and safe for the long run.
Final Words
In the action, we walked through every step, from preparing your tools to testing the final setup. Simple instructions helped tackle mounting, wiring, and configuring the Ring doorbell settings in the app.
We also covered troubleshooting common issues and offered practical safety tips for long-term care. Tackling each task one at a time makes the ring doorbell installation a manageable DIY project that boosts your home security. Enjoy the benefits of a smooth setup and a smarter, safer entrance.
FAQ
Frequently Asked Questions
What is the Ring doorbell installation cost?
The Ring doorbell installation cost varies by model and service choice. DIY setup is free, while professional installation can run around $100 depending on local rates and additional work.
What installation materials are available for the Ring doorbell?
The Ring doorbell provides a manual, PDF instructions, installation diagram, and a video walkthrough to guide you through every step from mounting to wiring, making setup straightforward.
How can I find Ring doorbell installation near me?
Searching online or visiting the Ring website helps you locate local professionals who can install your doorbell if you prefer not to do it yourself.
How do I install a wired Ring doorbell and does it need to be hardwired?
Installing a wired Ring doorbell means mounting the bracket, connecting existing wires, and using any required adapters. Hardwiring is essential for wired models to ensure continuous, reliable power.
How do I install a Ring doorbell without an existing doorbell?
Installing without an existing doorbell involves using the provided wiring kit or battery-powered options, which lets the device work independently while still offering smart alerts and features.
Can I install a Ring doorbell myself or do I need an electrician?
The Ring doorbell is designed for easy DIY installation, though hiring an electrician might help if extensive rewiring or complex configurations are required for your home setup.
Is there a monthly fee for using the Ring doorbell?
The Ring doorbell itself has no recurring fee; however, optional subscription plans, like Ring Protect for video storage, do involve a monthly fee.